Slice preallocation means we specify the len when creating the slice and it will create a slice with n-empty items on it. Then, to assign a value to the slice, we need to use the index.
Example of prealloc a userIDs
userIDs :=make([]uuid.UUID,len(assignments)) for i, assignment :=range assignments { userIDs[i]= assignment.AssignedBy }
In Autograd, there is a page where the admin can see a list of assignments. This page typically contains 10-20 assignments with pagination. Then, I was curious if there is an impact if we preallocate for this slice of struct, since in the article, the writer didn’t explain the struct layout. In the struct I tested, it has 8 fields, and 3 of them are also structs. In my honest opinion, this struct can represent many backend service codes.
For the benchmark, I want to check for lengths of 10, 20, and 50 slices to represent a real scenario. The result is interesting, where the preallocation has a big performance boost of 1000x! You can check the benchmark here.
go test -benchmem -bench . github.com/fahmifan/autograd/pkg/core/assignments goos: darwin goarch: arm64 pkg: github.com/fahmifan/autograd/pkg/core/assignments BenchmarkAssignmentNoPrealloc_10-83632083327 ns/op 15808 B/op 5 allocs/op BenchmarkAssignmentPrealloc_10-81657131737.198 ns/op 0 B/op 0 allocs/op
So, it's highly recommended to always preallocate a slice if we know the size ahead of time. The overhead is small, but the performance boost is significant.
]]>Self-Deploy Comment and Analytic App2022-02-26T07:00:00+07:00https://fahmifan.id/posts/2022/feb/self-deploy-comment-and-analytics/
After Migrating My site to 11ty, I decided to self-deploy the comment & analytic app for this website. Why? Because it's fun to learn something new and I'd like to keep those data on my box. So, these are my review for comments & analytics apps that you can self-deploy.
Comment
So, I begin by searching for the comment app. I want it to be lightweight so it won't take
many resources on my cheap server. I already know about Commento, so I search for "Commento alternative open-source", these the top result list:
Commento is widely popular, actively maintained, has a nice UI, has a managed cloud version & privacy compliant. The backend is written in Go, which is nice. But the managed version price is quite expensive for me & the DB choice is only Postgres.
Utterances is popular too, it uses Github issues as its backend, it's open-source, & privacy compliant. But you need to have a Github account to add a comment. So, It is not good for the general audience.
Isso is also popular, actively maintained, & privacy compliant. The backend is written in Python, and uses SQLite for the DB. The UI is ok, I just need to style the font to match my website style.
For the comment app, I choose Isso for its simplicity & SQLite choice as DB. The deployment is quite easy, it comes with a prebuilt binary. So, I just deployed it as systemd service and put it behind a reverse proxy.
Analytic
For analytics I already have some choices, they are:
Umami is popular & widely used, actively maintain, feature-rich & privacy compliant. It is written in NextJS and Prism. The UI is nice & the DB choices are Postgres or MySQL.
Plausible is quite the same as Umami, but it offered a SaaS version. It is written in Elixir, has modern UI, and It should be very performant. The DB choices are Clickhouse or Postgres.
Fathom has two versions the lite and pro. The lite version is the old Fathom, rarely maintained, written in Go and Preact, and the DB choices are SQLite or Postgres. The pro version is a SaaS & has more features compared to the lite version.
I also found GoAccess a server-side tracker. Written in C (super fast!), feature-rich, & privacy compliant.
For the analytic, I choose Fathom Lite. Even if it's not actively maintained anymore, I'll still be able to maintain it to some extent. Yeah, I forked it, upgrade the Go version, and fix some accessibility issues as suggested by the Chrome Lighthouse.
Deployment is easy because it is single binary & uses SQLite. I just make it as systemd service and put it behind a reverse proxy.
]]>Migrating Blog to 11ty2022-02-24T07:00:00+07:00https://fahmifan.id/posts/2022/feb/migrating-blog-to-11ty/
So, I migrate my blog to 11ty using Hylia Starter Kit. The reason is that it is more flexible and easier to customize.
My old Hugo blog was using template too but, it using the git submodule. Which is not realy easy to customize. Well Hugo is faster, but I don't think I'll need it for a small blog site like this.
The migration process is quite simple. First I degit the template using npx degit github.com/hankchizljaw/hylia. Then I change the site metadata like site title, author, email, favicon, etc. Then, I copy the markdown blog contents from Hugo to 11ty. Also, i decided to include the images in the blog repo, before this I store the images in a separate Github repo.
Deployment is the same, first I added a new submodule of my github pages into the 11ty blog repo. Build 11ty blog in production mode, copy the dist into the submodule, and pushed it. Then, the new site will be deployed by Github. The script looks like this
rm -rf ./dist/*
npm run production
cp -r ./dist/* ./thesubmodule
# Go To the submodule folder cd thesubmodule
# Stage changes to git. gitadd.
# Commit msg="rebuilding site `date`" if[$# -eq 1] thenmsg="$1" fi git commit -m "$msg"
# Push source and build repos. git push origin master
That's it how I migrate from Hugo to 11ty. Here is the lighthouse audit result
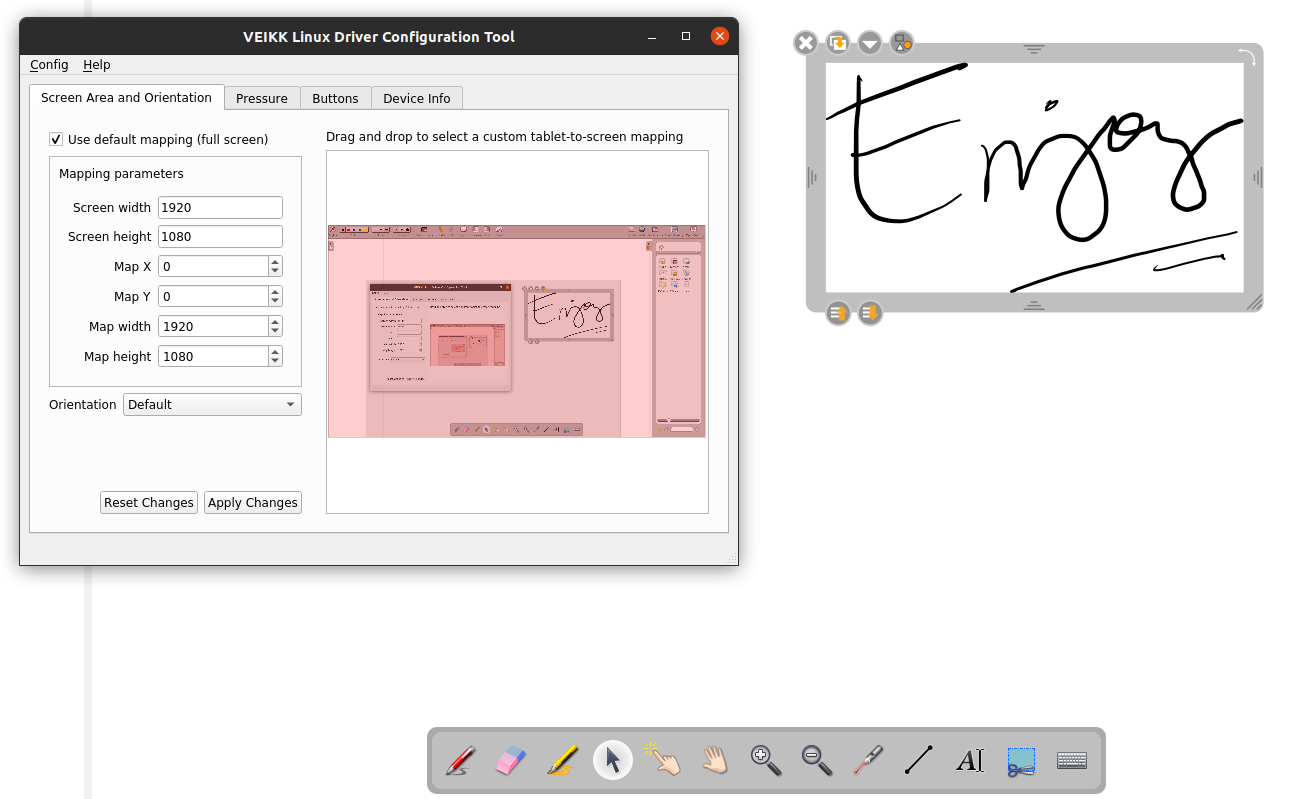
]]>Install Veikk Driver Linux2021-06-14T05:52:08+07:00https://fahmifan.id/posts/2021/jun/install-veikk-driver-linux/I decided to buy a Veikk pen tablet S640, but it's drivers only for Mac and Windows.
And fortunately, there are driver and GUI tools for the S640 from jlam55555.
Following the installation guides, voila! enjoy your pen tablet on Linux.
]]>What is LRU Cache And How It Works ?2021-06-13T10:24:35+07:00https://fahmifan.id/posts/2021/jun/lru-cache/What is LRU cache
A cache is a way to store data that accessed frequently and needs to be fast. We can use cache to store a result from computation or result of SQL query. A cache is usually stored in memory with a key-value style to make sure it fast to store item and access.
One of the cache algorithms is LRU or Least Recently Used. LRU will limit the memory usage by gives maximum items that can be stored. When there is a new item to be store and it already reached the limit, it discards the least used item.
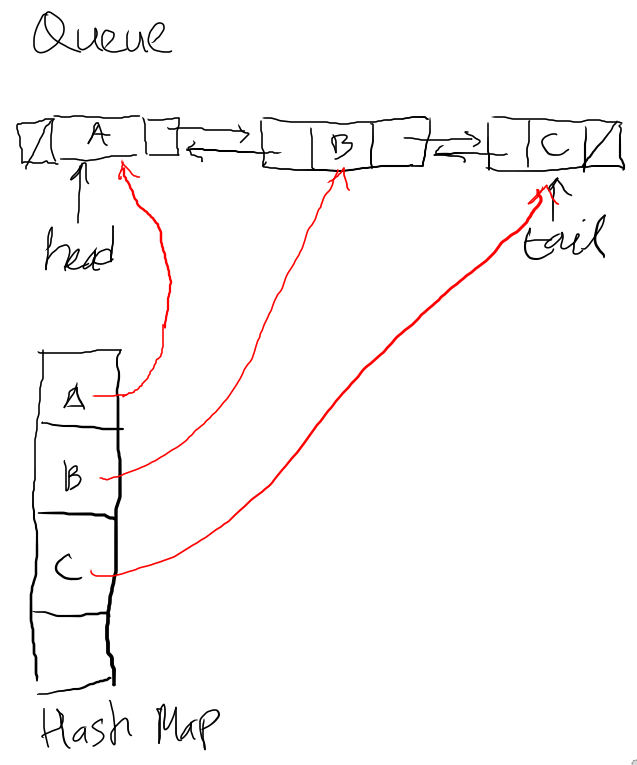
There are two main components in LRU cache, those are Queue and Hash Map. The Queue is used to store the items that implemented in a linked list, while the Hash Map is used to make the complexity O(1) when accessed.
Creating Queue
Disclaimer
The queue I implemented is based on my opinion, it may not be the "right" one :)
We need to create a struct for the cache item, a linked list node, and the queue.
type Queue struct{ head *Node tail *Node }
type Node struct{ item Item next *Node prev *Node }
type Item struct{ Key string // Value is used to store an item Value interface{} }
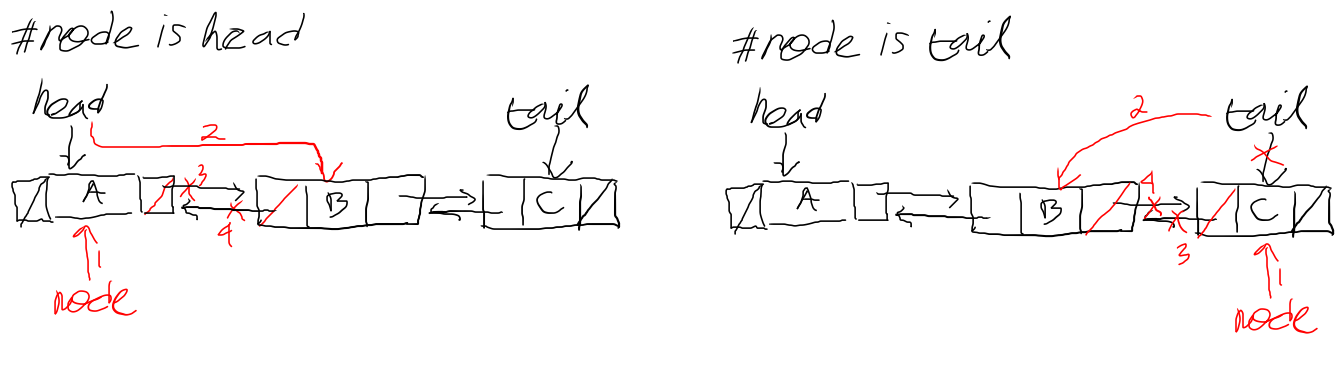
We will create three methods for the queue InsertFirst, RemoveLast, and RemoveNode.
The structure of the Node. It has three parts, prev, value, and next. The prev and next are pointers to an adjacent node. The value is an interface{} that can hold any data type.
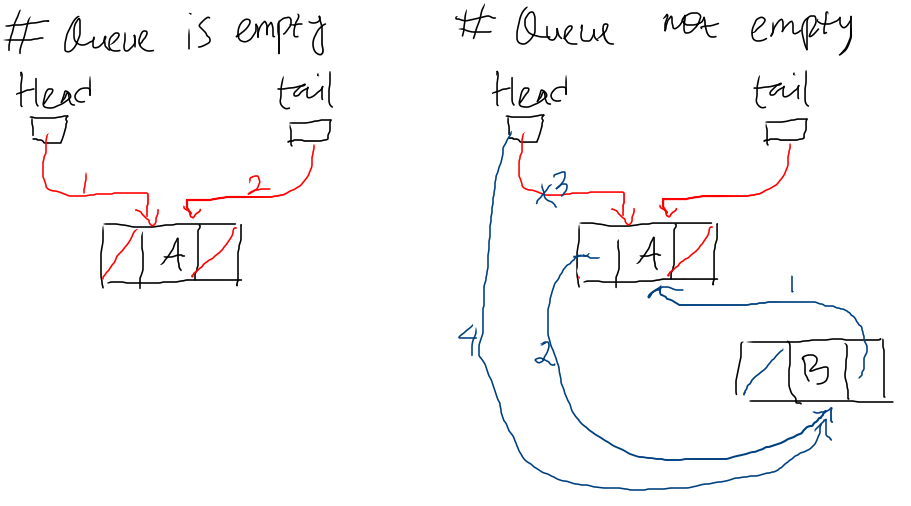
These are algorithm and code for InsertFirst
// insert a node into the first of the queue func(q *Queue)InsertFirst(newHead *Node){ if q.isEmpty(){ q.head = newHead q.tail = newHead return }
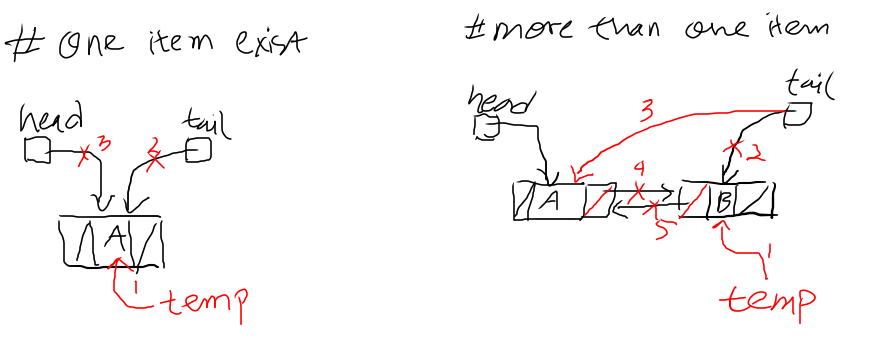
// remove a node from any position in the queue func(q *Queue)RemoveNode(node *Node){ if q.isEmpty(){ return }
if q.isOne(){ q.head.breakLinks() q.tail.breakLinks() node.breakLinks() return }
// node is first in the queue with following N-nodes if node == q.head { // new head is the next in the queue q.head = node.next node.breakLinks() return }
// node is the last in the queue with previos N-nodes if node == q.tail { // new tail is the one before the node q.tail = node.prev node.breakLinks() return }
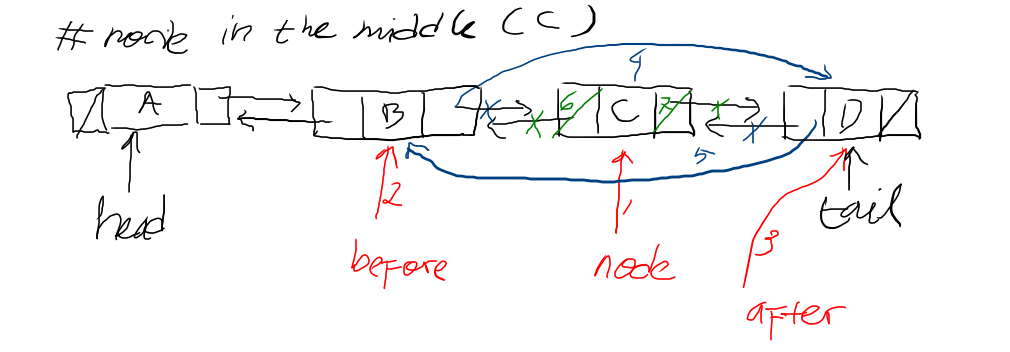
// node is in the middle of the queue after := node.next before := node.prev // link the before & after before.next = after after.prev = before node.breakLinks() }
The code for MoveToFirst
func(q *Queue)MoveToFirst(node *Node){ // no need to move, there is one or none in the queue if q.isEmpty()|| q.isOne(){ return }
Notes on Implement Synchronization for Concurrency
The previous codes work for non-concurrent usage because when accessing & writing to the hash map or queue, there are needs for lock and synchronization. Also keep in mind, that adding synchronization will impact the performance.
We can use a mutex for synchronization. In Go, there are two types of mutex, Mutex and RWMutex. The Mutex is general purpose for locking only one goroutine that has access to a resource. The RWMutex has two locking mechanisms. The first is RLock that can behold by multiple gorutines and is used for reading. The Second is a Lock that can only behold by one goroutine and is used for writing.
I use two mutexes for LRUCacher, hashMutex for access & mutating hash, and countMutex when mutating the count. Also, to help to detects race condition, I use -race flag when running the go test
go test -race ./...
The rest of the code can be checked in this repo lrucache
type LRUCacher struct{ maxSize int64
queue *Queue count int64 countMutex sync.RWMutex
hash map[string]*Node hashMutex sync.RWMutex }
The benchmark
go test -benchmem -run=^$ -bench ^(BenchmarkLRUCacher)$ github.com/fahmifan/lrucache

goos: linux
goarch: amd64
pkg: github.com/fahmifan/lrucache
cpu: Intel(R) Core(TM) i5-7400 CPU @ 3.00GHz
BenchmarkLRUCacher/Put-4         	 2813918	       422.4 ns/op	      89 B/op	       4 allocs/op
BenchmarkLRUCacher/Get-4         	 9076047	       131.4 ns/op	      16 B/op	       1 allocs/op
BenchmarkLRUCacher/Del-4         	11179544	       107.6 ns/op	      12 B/op	       1 allocs/op
PASS
ok  	github.com/fahmifan/lrucache	4.228s
That's the LRU Cache and how you can implement it in Go :)
]]>Setup Bluetooth Adapter on Linux2021-06-09T06:52:16+07:00https://fahmifan.id/posts/2021/jun/setup-bluetooth-adapter-on-linux/I have a desktop with Linux installed on it and i would like to add bluetooth adapter for it. This is my Linux version
➜ uname -v -r
5.8.0-55-generic #62~20.04.1-Ubuntu SMP Wed Jun 2 08:55:04 UTC 2021
So i decided to bought
this "ORICO BTA508 USB Bluetooth 5.0 Dongle BTA 508 BTA-508 Adapter - Hitam" from Tokopedia. But, the only official driver/firmware is for Windows.
Then, how about Linux ? To solve this question, we need to know which chip the bluetooth uses and install a custom firmware/driver.
Use this command to check what chips the bluetooth adapter use
dmesg | grep -i Bluetooth
The output should looks like this
[    1.810236] usb 1-4.2: Product: Bluetooth Radio
...
[    3.546498] Bluetooth: hci0: RTL: loading rtl_bt/rtl8761b_fw.bin
[    3.551034] Bluetooth: hci0: RTL: loading rtl_bt/rtl8761b_config.bin
...
This line hci0: RTL: loading rtl_bt/rtl8761b_fw.bin shows us, that the chip is rtl8761b and it need rtl8761b_fw firmware/driver.
So i google rtl8761b_fw and found an article from raspberry forum with the same question.
But, to be sure i look up to it once again and found this arch linux post. After i read from arch linux post, i decided to follow it. So, i download the driver from the source mention in the article and follow the steps from the raspberry forum article as follows:
]]>Information Overflow2021-03-21T18:13:57+07:00https://fahmifan.id/posts/2021/mar/controlling-information/Like eating, consuming informations should have a portion.
We have limited appetiet, too much eating results into sick stomach, stress.
Fear of Missing Out or FOMO, is a kind of anxity that comes from "too much information".
Internet might be the source of this. Why ? Open internet, bring massive, free, and
accessible information into socity. Social media, a decendant of internet known as "rich" in information, such as Twitter, Instagram, Tiktok, Youtube. Game, richer than those socmeds combine audio, visual, story telling and interactivity.
So, what is the root that cause this "Information Overflow" ?
Is it our behaviour that keep staring at our screen ? Is it the context switching? Socmed has many different context between it tweets. Is it creates low quality in absorbing information ? Is it creating the FOMO ? Do we actually have this "quality" ?
My hunch is yes. Actullay, i barely remember the tweets that i have read. When i found an interesting articel/tweet i save it into "getpocket" app. But, its unlikely that i'll visit them in getpocket. This might be the result of FOMO.
In Software Engineering, there is a phrase You Aren't Gonna Need It or Yagni. It means, you rarely need something that beyond scope. Now, how to identify if something categorized as Yagni ? If it less or insignificant, leave it, put it into Yagni. I think, information around internet is the same, the level of significant will weigh them to falls into Yagni or not.
But, how to make the information a Yagni or not for us, if we have not read or saw it ? I don't know yet. May be, we can hide them behind a software. It is like someone hand picked information for us in digestable size.
]]>Apa Itu Event Bus ?2020-04-05T15:43:31+07:00https://fahmifan.id/posts/2020/march/apa-itu-event-bus/Event bus adalah sebuah mekanisme yg bisa dipakai untuk berkomunikasi antar komponen tanpa saling tahu satu sama lain. Kalau bisa saya bilang ini juga bagian pub-sub pattern. Lalu, apa kegunaan dari event bus ini?
Kegunaanya adalah untuk decoupled antar komponen sehingga tidak saling bergantung secara langsung.
Keuntungan lainnya adalah, kita bisa membuat monolith rasa microservice.
Dalam arsitektur microservice, salah satu pattern yg sering dipakai adalah pubsub, dan kita bisa menerapkan pubsub ini dalam arsitektur monolith melalui event bus.
Jika digambarkan event bus itu berbentuk seperti gambar berikut
Dimana ada publisher yang dapat mengirim sebuah pesan ke Event Bus dan pesan ini dapat didapatkan oleh banyak subscriber.
Menggunakan event bus
Kita akan coba menggunakan event bus dalam program yang akan kita buat. Dan kita akan membuatnya menggunakan bahasa Go atau Golang.
Yang akan kita jadikan kasus adalah order barang dan payment pada sebuah Online shop. Ketika user membuat sebuah order maka akan dibuat sebuah payment.
Oke, pertama kita perlu melakukan ini project. Buat folder project kalian, lalu init module dengan mengetikkan command go mod init shop di folder project. Untuk mempersingkat, saya akan namai module ini sebagai shop.
Versi Go yang digunakan pada saat pembuatan artikel ini adalah go1.12.17.
Selanjutnya kita akan buat model nya terlebih dahulu. Buat package model, lalu buat file model.go.
├── model
│   └── model.go
Di package model ini, kita membuat tiga buah struct yaitu Product, Order, dan Payment.
Sebuah Order dapat memiliki banyak product di dalam nya.
package model
import"fmt"
type Product struct{ ID int64 Price float64 }
type Order struct{ ID int64 ProductIDs []int64 }
Lalu sebuah Payment akan memiliki OrderID berikut PaymentStatus nya.
PaymentStatus ini bisa dibilang adalah sebuah "enum", yang memiliki tiga tipe yaitu pending, paid dan canceled.
type Payment struct{ ID int64 OrderID int64 Status PaymentStatus }
Selanjutnya, kita akan membuat package service. Ada tiga buah service yang dibuat yaitu ProductService, OrderService dan PaymentService yang semuanya merupakan interface.
└── service
    └── service.go
ProductService akan memiliki method yaitu List. Lalu, OrderService memiliki method CreateOrder. Terkahir, PaymentService akan memiliki method CreatePayment.
Selanjutnya kita perlu melakukan implementasi dari interface tersebut dengan struct.
Pada package service buat file product_service.
└── service
    ├── product_service.go
Untuk mempersingkat, data product akan kita simpan di dalam field products. Lalu, dengan fungsi NewProductService kita melakukan instansiasi productService sekaligus mengisi field products dengan data dummy.
package service
import( "shop/model" "time" )
type productService struct{ products []model.Product )
Lalu, buat file order_service pada package service.
└── service
    ├── order_service.go
Pada kode ini, terdapat field bus dengan tipe *bus.Bus yang digunakan untuk mempublish event/topic. pacakge yang digunakan adalah github.com/mustafaturan/bus. Argumen ke dua pada fungsi Emit adalah nama topic yg dipublish, di sini kita gunakan nama order.created.
funcNewBus()*bus.Bus { // configure id generator (it doesn't have to be monoton) node :=uint64(1) initialTime :=uint64(1577865600000)// set 2020-01-01 PST as initial time m, err := monoton.New(sequencer.NewMillisecond(), node, initialTime) if err !=nil{ log.Fatal(err) }
// init an id generator var idGenerator bus.Next =(*m).Next
// create a new bus instance b, err := bus.NewBus(idGenerator) if err !=nil{ log.Fatal(err) }
return b }
Oke, selanjutnya kita akan membuat package eventhandler.
├── eventhandler
│   └── handler.go
Event bus ini memiliki sebuah handler yg berupa fungsi. Handler ini gunanya untuk menerima event-event yang diemit ke dalam event bus. Dari event yang diterima kita dapat mengecek jenis topic-nya.
bbus := eventbus.NewBus() bbus.RegisterTopics([]string{"order.created"}) bbus.RegisterHandler("order-channel",&bus.Handler{ Matcher:"order.*",// match untuk semua order Handle: handler.HandleOrder, })
0096Tf1h00000001 merupakan id dari event yang diemit, dari urutan log yg muncul.
Jadi, begitulah cara kerja dan penggunaan event bus. Mungkin, di artikel selanjutnya akan dibahas implementasi event bus pada sebuah web service.
]]>Background Job Worker2019-07-09T08:06:42+07:00https://fahmifan.id/posts/2019/july/background-job-worker/Dalam pengembangan web, request yang memerlukan process yang lama (long running) dapat memblokir request lain. Kalo seperti ini, maka web kita tidak responsive dan cepat. Process lama ini dapat kita alihkan ke process lain yang berjalan di samping process utama yang disebut worker.
Salah satu pattern umum untuk menggunakan worker adalah ketika ada request ke web servis, maka akan di-reply langsung, lalu akan dijadawlkan task dari request tersebut ke worker. Misalkan kita mendapat requirement sbb:
Ketika user mengupload gambar, resize terlebih dahulu baru simpan ke storage
Dari requirement tersebut dapat dibagi menjadi:
jalankan worker yang menunggu "tugas" masuk
tunggu user selesai upload
balas dengan status "sedang diproses" ke user dan kode http status 2xx
jadwalkan "tugas" meresize gambar yang diupload ke worker. Bisa dengan memasukkan "tugas" ke dalam process antrian (queue)
worker mengambil tugas dari antrian
worker meresize gambar, lalu simpan ke dalam storage
Dengan menggunakan worker aplikasi menjadi lebih cepat dalam memberikan balikan ke user & mengurangi long running request yg menyebabkan bloking.
]]>Domain Driven Design (1)2019-06-24T08:06:30+07:00https://fahmifan.id/posts/2019/june/golang-ddd/Dalam kehidupan, manusia tidak lepas dari pekerjaan. Pekerjaan yang dilakukan pun terkadang berulang dan memiliki pola tersendiri. Ada kalanya bertemu masalah kecepatan dan kapasitas dalam bekerja. Pekerjaan atau proses yang berulang dapat dilakukan otomasi menggunakan software. Selain itu, software dapat digunakan dalam pemecahan masalah.
Dalam membuat software, harus mengerti dulu apa yang dibutuhkan oleh suatu bisnis atau pekerjaan. Untuk dapat membuat software yang tepat guna, diperlukan kolaborasi antara engineer dan stake holder. Kunci dari kolaborasi yang apik adalah komunikasi yang dapat saling dipahami. DDD atau Domain Driven Design, sebuah prinsip pembuatan software dari tahap desain sampai development yang berkolaborasi dengan domain expert (ahli). Tanpa penguasaan yang mendalam tentang suatu permasalahan, maka sulit untuk mengatakan solusi yang dibuat dapat tepat guna. Di sini lah peran seorang domain expert menjadi penting.
Prinsip DDD
Ubiquitous Language
Ubiquitous Language, bahasa yang dapat dimengerti oleh semua orang. Memadukan antara bahasa teknis dengan jargon-jargon di dunia bisnis. Dapat dikatakan juga, membuat desain software yang dimengerti oleh domain expert, jika perlu sampai ke level abstraksi kodingnya.
Model Driven Design
Dari permasalahan yang sudah dipahami, perlu dibuat permodelan yang dapat diimplementasikan oleh developer. Beberapa pondasi dari pembuatan model ini adalah:
Layered Architecture
Memisahkan bagian-bagian dalam software sesuai dengan peruntukannya. Jika pernah membuat sebuah aplikasi website dinamis, tak jarang berjumpa dengan konsep MVC atau Model View Controller yang merupakan sebuah arsitektur software. Berbeda dengan MVC, Layered Architecture ini lebih kepada mengisolasi kode logik bisnis yang inti dari dependensi luar. Dependensi ini dapat berupa akses ke database, user interface (API), pustaka pihak ketiga, dsb. Bagian yang diisolasi ini disebut sebagai layer aplikasi.
Refactoring berkelanjutan
Dalam membuat kodingan, sering kali solusi pertama yang dibuat kurang bagus. Baik dari segi efektif nya atau kejelasan maksud kodingan. Untuk itu, refactoring berkelanjutan menjadi hal yang sering dan perlu dilakukan.
Bounded Context
Bagian ini belum penulis baca dan pahami dan akan diupdate di kesempatan berikutnya
Kesimpulan
Dari tulisan pendek ini, semoga dapat memicu sedikit rasa penasaran pembaca tentang membuat Software yang andal melalui DDD ini. Ini merupakan bagian satu, selanjutnya penulis akan coba praktik langsung pada proses pembuatan sebuah aplikasi.
Setelah lulus dari program Google Developer Kejar (GDK), saya berkesempatan mengikuti Bekraf Developer Conference atau BDC dari Dicoding.
BDC kali ini diadakan kembali di Bandung, tepatnya di The Papandayan Hotel. Pada BDC tahun ini, terdapat dua track yaitu dari track dari Dicoding dan track dari Asosiasi Game Indonesia.
Track yg saya ikuti adalah Dicoding. Ada 4 sesi dalam track ini. Sesi pertama membahas tentang Hegemoni Jurusan IT. Sesi kedua tentang Mencetak Talenta Digital dari Kampus. Sesi ketiga tentang Melahirkan Mutiara Digital dari Komunitas. Sesi keempat tentang Tantangan Membangun Aplikasi.
Hegemoni Jurusan IT
Jurusan IT di kampus bukan menjadi satu-satunya tempat belajar menjadi softawre developer, tapi banyak tempat non-formal yg menyediakan pelatihan baik online maupun offline. Bahkan seseorang driver gojek tanpa pendidikan formal bisa menjadi mendapatkan pekerjaan sebagai software developer setelah mengikuti pelatihan.
Selain itu, software developer juga tidak hanya berasal dari jurusan IT, bahkan dari jurusan lain pun selama memiliki kemampuan bisa memiliki pekerjaan sebagai sebagai software developer.
Mencetak Talenta Digital dari Kampus
Sesi ini diisi oleh para dosen jurusan IT. Salah satunya adalah Dr. Inggriani Liem mantan dosen di STEI ITB. Beliau menjelaskan tentang bagaimana menjadi seorang Software Developer yang sukses. Yang dapat saya rangkum adalah: Pelajari Computational Thinking, Algoritma-Struktur Data, dan Fungsional & Object Oriented Paradigm.
Selain itu, dosen lain juga menjelaskan kondisi mahasiswa mereka di kampus. Menurut salah satu dosen, mahsiswanya itu kepingin yang instant-instant, contohnya dikasih tugas pingin yang mudah dan cepat jadi. Lalu, dosen yang lain menjelaskan bahwa mahasiswanya itu kurang minat dalam mempelajari kuliahnya, sehingga beliau sering memberikan motivasi.
Pada sesi ini, datang salah satu murid Dr. Inggriani, beliau menanyakan apakah mungkin mempersingkat waktu mempelajari konsep dasar pemrogramana sampai 3 bulan. Menurut Dr. Inggriani, ini bisa dilakukan asal, lingkungannya sudah mendukung untuk computational thinking. Karena, kendala di Indonesia masih ada saja daerah yang belum memanfaatkan penuh teknologi komputer ini.
Melahirkan Mutiara Digital dari Komunitas
Di sesi ini, hadir penggiat komunitas dari GDE Android Indonesia, Lead Jakarta JS, Software Engineer LINE sekaligus dosen Binus, dan co-founder Codepolitan. Mereka bercerita bagaimana mereka tumbuh dari komunitas, peranan komunitas dalam memajukan SDM Software Developer di daerah, bagaimana komunitas bisa membantu LINE dalam mengenalkan fitur API LINE ke developer di Indonesia.
WIP ...
Tantangan Membangun Aplikasi
WIP ...
]]>Download Youtube Mp3 File Using `youtube-dl`2018-09-15T16:45:48+07:00https://fahmifan.id/posts/2018/september/download-youtube-mp3/This is the command to download it
if you using zsh or fish wrap the url using quotes 'url'
Happy downloading
]]>Adb Meetup 42018-07-26T05:47:03+07:00https://fahmifan.id/posts/2018/juli/05-adb-meetup-4/So last night i attend my first Android Developer Meetup in Bandung from ADB that held in Dicoding Space. The topics are about "A/B Testing Using Firebase Remote Config" & "Make a Android Starterkit using Yeoman Generator".
A/B Testing Using Firebase Remote Config
In this first talk they told us what is A/B testing, how to do it, and the technical part on do A/B testing using the Firebase Remote Config.
What is A/B Testing
A/B Testing is used when you want to know what design that works for your users. It can be different design of button, checkout page, color scheme, fonts, ect.
How to do A/B Testing
First, you need to set your goal. What do you want to get from this testing.
Let's say you have an online news/magzine. Your users can read a part of your article, but to read the full article they need to sign in/up. So you want to increase the sign in/up rates from this.
Now you make a hypothesis, the user will sign in if i make the button in capsule instead of rectangle shape.
Then you make two version of it and send the new version you want to test to your sample users.
Then after you collect the data about your test. You can decide now, if the change on the button affect the sign in/up rates to your app.
Comming soon:
A/B Testing using Firebase Remote Config
Android Starter Kit Genereator using Yeoman
]]>Tokopedia Devcamp: Online Test2018-07-23T16:01:57+07:00https://fahmifan.id/posts/2018/juli/04-tokopedia-devcamp/So, today i just did my online test for Tokopedia Devcamp 2018. This is my second time do online test, and it not that bad. Before, i was always feeling that i woludn't survive on algorithmic test type. The reason for this is because when i take algorithm class in my first year, i did not that good. Sometimes i get overwhelmed to solve a pyramid stars.
"At least I've been trying hard"
That was my motivation to prepared for this online test and keep trying to solve excercises. Just try it and feel the struggle, but when you solve it you will get that eureka moment. Even if i can't solve it, at least i've been trying hard.
I hope this test get a good result, and i can go for interview.
If you want to try or learn algorithm/competitive programming try these
I used codility to excercise since the online test use codility.
Thank you :D
]]>New Project in Android2018-07-19T16:40:15+07:00https://fahmifan.id/posts/2018/juli/03-learn-material-design/I have a project with my friends for MTQMN DAQ. It's an android app with a feature kind of to detect your recitation. It's still WIP and i worked on the android development, while my friends work on Machine Learning and as a project manager. This project is challenging, because i am new to android development and trying to make a good decision about architecture and design is not easy. I need to read more about design pattern, RxJava2, and material design. I hope i can make it on time and qualified to the final round :).
I'd like to post my journey of making this apps in future posts. Well, my english is not that good, so i might use Bahasa Indonesia if it's too difficullt for me to explain it in english. Hahaha!
]]>Move Blog to Hugo2018-07-19T03:29:18+07:00https://fahmifan.id/posts/2018/juli/02-move-blog-to-hugo/So, i just tried Hugo and it was super easy to build static web. The installation is faster and easier compare to jekyll. The build time is also fast. Will try to explore later.
The deploy is easy, you only need to write some script there is example from Hugo if you using Unix, and then run the script. If you using Github for User , after the script run then it will push into the master branch and finally updated into your github pages.
But i have bad experience using this, when i trying netlify i just don't know how to make it worked, it keep error when try to fetch submodules. This is the first time i used git submodules and it was like wasting my time. But i just too curious, and end up hours of googling, but in the end i get what i want.
]]>Make resume from html-css-js.md2018-07-12T03:29:18+07:00https://fahmifan.id/posts/2018/juli/01-make-resume-from-html-css-js/this is the command that does the job. Well for now it only ouput properly in image format. I am still looking for solution to output in pdf format. This is using Wkhtmltopdf :
I'm using local server for this and code in vscode :D
]]>Trying mobile app development2018-02-28T03:29:18+07:00https://fahmifan.id/posts/2018/februari/2018-2-28-develope-mobile-app/At school we were told to make a mobile app for android. The teacher said we can use Java, because this is for the lecture of OO Programming 2, the OO Programming 1 was about basic Java SE. For this lecture we will develop mobile app alone not in a team.
I proposed to my teacher if i can used React Native for developing later and he said yes. So, i run into React Native page and set up for local dev. After a while the API and structure was a little bit different to ReactJs. I struggled when trying to connect my phone to my laptop using expo app. It failed several times, but i can figured it out after digging into stack overflow & github issues. The hot reload sometimes failed, i haven't found the answer for this one, after all it was quit fun. Maybe i'll follow for more tutorial about developing mobile app in React Native.
After some reasearch i get a suggestion in youtube about Flutter. It's a framework for bulding android & ios app using Dart language. It was inspired by react they said and after tried it building simple app following their guids, it was really enjoyable develop in Flutter.
]]>One sprint, One App2018-02-12T03:29:18+07:00https://fahmifan.id/posts/2018/februari/2018-2-24-food-app/For the last week I do sprint for making a food app. When i go to college, sometimes i have to stay overnight in my friends house. Doing homework make us hungry and when we want to order food we don't have the menus and it was annoying so i want to make a webapp to display a menus of small restaurants there. It build using ReactJs, tachyons, & styled-components for frontend & lumen for backend api. It's still in development but the core feature is done, it left the login and adding reviews for a restaurant features. This is my first project outside the college tasks and i have a lot of trouble and fun. Still progress to finishing all features and then deploy it to the web.
]]>